Showing posts with label without xanthan gum. Show all posts

Wednesday, October 5, 2011

Pizza By Ratio

Pizza with bell peppers (under cheese), artichoke hearts and caramelized onions
I guess I'm in a pizza kind of mood lately. I just realized my last post was a pizza post, making two pizza posts in September. You can't ever get enough pizza, right?

When I found out we were doing pizza crust for our Gluten-Free Ratio Rally this month, I was tempted to try and figure out the ratio for my go-to pizza crust. It's tried and true (and edited many times over!!), and I love it because it reminds me of family nights growing up. I decided against it, however, and pushed myself again. (But I did use some of the same flours.) If you're looking for a great-tasting, whole-grain gluten-free pizza crust to top however you wish, this pizza will deliver.

I love these rally challenges. They make me a better gluten-free cook/baker and prove nearly anything is possible in a gluten-free kitchen.


Logo designed by Anile Prakash

A big thank-you goes to Karen over at Cooking Gluten-Free!, our host for this month's rally challenge, for hosting us this month. Be sure to check out Karen's crust ratio recipe for garlic, artichoke, sun-dried tomato, pesto pizza (Oh. Yum.) and all the other delicious ratio pizza recipes from the participants this month. She has the links on her post, and there is something for every taste there.

If you're unfamiliar with the ratio rally, check out my rally page, where I have all my other rally posts which link to each monthly host, as well as Shauna's post on Gluten-Free Girl and The Chef, which was the very first rally post.

I decided to keep it simple this time around and let you choose your own toppings. I'll list some of my favorites to get you started, but this post is about the crust. It's filled with healthy whole-grain goodness and taste, and both daughters and my husband loved it. This crust has the right amount of crunch on the edges and bottom, and the right amount of soft, chewy bread for the rest. It doesn't fall apart when you pick it up, so you can eat the entire thing with your hands. It also still tastes great reheated in the oven or microwave.


I used Ruhlman's ratio for basic bread dough for this pizza crust: 5 parts flour: 3 parts water (plus yeast and salt), or 5 oz. flour: 3 oz. water. His basic recipe makes two crusts (20 oz. flour, 12 oz. water), but this particular recipe will make one pizza at least 12 inches across. I halved the recipe while I was experimenting with the ratio, so I wouldn't waste too many ingredients if things didn't turn out right, and thought it might be a good idea to keep it that way for those of you who aren't feeding a crowd. If you want more pizza crust, simply double, triple etc. to your heart's desire.

Projected prep time: 15 minutes; Rise time: 1 hour; Projected bake time: Total of 25-30 minutes
(Printable Recipe)

3 oz. (83 grams) tapioca starch (flour)
1 oz. (28 grams) potato starch (not potato flour)
*2 oz. (56 grams) sorghum flour (*see note below)
2 oz. (56 grams) amaranth flour
2 oz. (56 grams) teff flour
1 tsp. kosher salt
5 oz. very warm water (a tad less than 2/3 cup)
1/4 tsp. sugar
1 tsp. active dry yeast
1 oz. water (2 tbsp.)
1 tbsp. milled flax seed
1 tbsp. (1/2 oz.) extra virgin olive oil
Extra virgin olive oil, for brushing
Cornmeal (optional)
*OR replace the 2 oz. sorghum with 2 oz. (56 grams) millet flour (I preferred the crust with sorghum, husband liked the millet better. Both tasted great and not much difference.)
Toppings

Combine flours with salt.


In a small bowl, combine 2 tbsp. of water with the milled flax seed to create a slurry, then let it sit.


Mix sugar into warm water, then sprinkle yeast into water. (This isn't necessary, but I like to see that the yeast is doing its job before adding it to the flour.) Let sit for 10 minutes.


Pour olive oil into flour. Stir flax slurry (it should be much thicker at this point), pour into flour. Pour yeast and water into flour.

Mix with dough hook at low-medium speed until flours begin to combine, then scrape the bowl to make sure all the flours are incorporated (you may have to do this a few times - or you can start with the paddle, then scrape and switch to the dough hook.) If you don't have a stand mixer, you do all of this with a wooden spoon. Continue to mix ingredients until dough forms a ball. If you mix past this, it's okay - and may even be a little better, but the dough won't be a ball anymore. That window is very small, and I miss it many times when I'm not paying attention. It just makes it a little easier to get out of the bowl when it's still in a ball.

Transfer dough to a ceramic or glass bowl (not necessary, but I do this because I let it rise in my oven and my mixer bowl doesn't fit very well in there on the racks) and cover bowl with a damp clean cloth or dish towel. Move to a warm, draft-free spot and let it rise for an hour. (As I said above, I use my oven. I warm my oven to about 100 degrees about 10 minutes before I start the dough, then turn it off. By the time it's ready to rise, the oven is warm but not too warm. And as long as I don't need it for something else, it makes a great place to let the dough rise.)
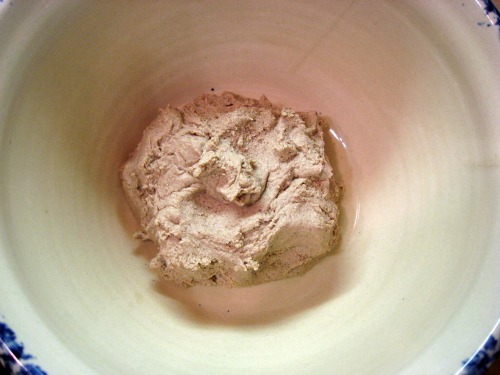

After an hour, your dough should be about doubled in size. Preheat oven to 400 degrees. (Remove your dough first if you're using this spot to let it rise!)


Unless you're using a pizza stone (I don't use mine in any of these photos), rub a little olive oil onto the pan surface. If desired, sprinkle a tiny amount of cornmeal on top. (I usually do this.)

Roll or pat your dough out evenly onto the pan.


Brush with a light coating of olive oil, prick with a fork a few times. Bake for 10 minutes.

Top with desired sauce(s) and toppings (see some of my favorites below if you need ideas), then return to oven for 15 to 20 minutes, or until cheese (if you're using it) is melted and beginning to bubble.

Artichoke & caramelized onion
Turkey pepperoni & fresh onion
 Let sit for 5-10 minutes before cutting.

You can see that the crust holds up, even hot out of the oven, to bending and being held by hand:


*Just a sampling of some of my favorite toppings, in no particular order:
Pizza sauce, ricotta cheese, garlic, mozzarella, feta, spinach, artichoke, white onions, red onions, caramelized Vidalia onions (in butter & Tony Chachere's), green bell pepper, red bell pepper, jalapeno pepper, turkey pepperoni, pineapple, chicken and apple sausage, turkey sweet Italian sausage, mushrooms, olives, fresh tomatoes

Some of my favorite topping combinations:
-Tomato pizza sauce, diced green bell peppers directly on top of sauce, mozzarella cheese, turkey pepperoni, pineapple, fresh red onion
-Ricotta mixed with fresh garlic, topped with mozzarella, then topped with sauteed zucchini sticks, salt and pepper OR fresh spinach instead of zucchini, directly on top of ricotta and then mozzarella on top of spinach
-Tomato pizza sauce, jalapeno slices, caramelized onions and sweet turkey Italian sausage with mozzarella
-Tomato pizza sauce, feta cheese crumbles, mozzarella cheese, chicken and apple sausage and caramelized onions (my brother got me onto that one)
-Tomato pizza sauce, red or green bell pepper, artichoke hearts and (or not) caramelized onions

Enjoy with the toppings of your choice!


Don't forget to head on over to Karen's host post to see her amazing pizza and all the other fantastic recipes brought to you by rally participants this month! Thanks again, Karen!

Wednesday, August 3, 2011

Fresh-Squeezed Lemon Cake


I have a lot of happy memories surrounding cake of all kinds, flavors and colors. I don't think that's necessarily because cake makes me happy, but mostly because I was eating cake during happy times. That said, however, let's face it: Cake makes me happy.


I love eating cake, I love decorating cake, I love the satisfaction of mixing and baking a cake and pulling it out of the oven and knowing that I did a good job, and that the cake cooperated with me to turn into a good cake. And did I mention I love eating cake?


But not just any cake. I don't like dry cakes. Not one bit. They have to be moist or at least not be dry and crumbly. I don't want to feel like it's drying my mouth out. I prefer dense cakes, but I also adore light, airy angel cakes. I like a tender crumb or a firm cake equally, as long as it isn't dry and it has great flavor. Almond is my favorite, but I also love nearly any other flavor including chocolate. I don't skimp on cake ingredients, either. Real butter and pure everything, please and thank you. (There is a difference between butter, shortening and lard in cakes, no matter what the lady behind the counter at a local grocery bakery said in her argument with me.)


So it's no wonder that I was excited when Kate from Gluten Free Gobsmacked - our host this month for the Gluten-Free Ratio Rally, said we were doing white or yellow cake for our theme. Check out her rally post where she gives her incredible cake ratio recipe and hosts all the other delicious recipes the other participants baked up this past month. (And thanks, Kate, for hosting us!)

Logo designed by Anile Prakash

Cake is also the reason I decided to give the ratio rally a try. Cake is the first thing I tried with weight baking (not ratio) - and it was the weight baking that made my favorite cake recipe finally come out perfectly while still being gluten-free - as I detail with many words and photos in this post about my beloved four-egg cake.

(If you want to read more about my reasons for joining up with the ratio rally, you can check out my peach poppy seed bread post here. I also have links to all the rally posts I've written in the recipe/subject index.)

I tried to get my four-egg cake to work out into a clear ratio because in my own opinion and that of many friends and family members, it is one of the best cakes ever. Sadly, however, it just didn't work out into a ratio that made much sense. 

I'm glad, though. I once again was forced to step out of my comfort zone and try something beyond my tried-and-true. The result was nothing short of mouth-watering delicious. The texture soaked up the flavor quite well, and it was the perfect amount of sweet and almost-puckering lemon. I make a lemonade cake that has a little different texture and frosting, and wanted to get a similar taste in a bit different cake this time.


For this cake, I used Michael Ruhlman's sponge cake ratio of 1:1:1:1 (1 part egg:1 part sugar: 1 part flour: 1 part butter - 8 ounces each in this recipe). That being said, I'm not sure if it was because of the gluten-free flours or the difference in mixing according to Ruhlman's instructions as opposed to what I'm used to for sponge cakes (Joy of Cooking), but this cake turned out much more like a butter cake, in my opinion, than a sponge cake. I'm used to sponge cakes (even my gluten-free ones) being much more light - almost like an angel cake with a yellow color and not as high. This cake was very firm and pretty dense. But it was a fantastic cake, nonetheless.


The next time I make it, I'll experiment with backing off an ounce or so of starch and replacing it with more brown rice flour, as well as using my preferred organic cane sugar rather than the refined pure cane sugar I used this time around. I think the flour change may make the cake have a little more tender crumb.
Projected prep time: 15 minutes; Projected bake time: 35 to 40 minutes
Cake:
8 oz. eggs (4 large eggs plus one yolk)
8 oz. pure cane sugar
1 tsp. kosher salt
2 tbsp. fresh-squeezed lemon juice
1/2 tbsp. fresh lemon zest
1 tsp. pure vanilla
2 tsp. baking powder
1 1/4 oz. almond flour (34 grams)
3 1/4 oz. brown rice flour (93 grams)
3/4 oz. sweet rice flour (20 grams)
1 1/4 oz. tapioca starch (35 grams)
1 1/4 oz. potato starch (37 grams)
1/2 oz. white rice flour (13 grams)
8 oz. (2 sticks) unsalted butter, melted but cooled to room temperature

Filling:
Lemon curd (homemade or store-bought, just make sure it's gluten-free)

Glaze:
3 1/2 cups powdered sugar
Fresh-squeezed lemon juice

Lemon peel curls and slices for garnish

Have all ingredients at room temperature.

Preheat oven to 350 degrees and line bottom of 9-inch round cake pan with parchment paper.

Combine your room-temperature eggs, sugar, salt, lemon juice and vanilla in large mixing bowl. Whisk at low-medium speed until the sugar begins to dissolve, 


then switch to high for about five to seven minutes, 


until the eggs have turned a light yellow color and have increased some in volume.


Sift your room-temperature flours together with the baking powder and carefully fold the flour mixture into the egg mixture until combined.


Fold room-temperature melted butter into the mixture and pour into lined pan.

Bake 35-40 minutes, until a toothpick inserted in the center comes out clean. I opened my oven at 25 minutes to check it and it was too soon, causing the cake to fall a little in the middle.


Place pan on a wire rack to cool for several minutes. 


When cooled enough to touch, run a knife around the edges and flip over onto the wire rack. Let it cool a few more minutes, then carefully slice the cake in half horizontally to make two layers.

Place the cake pan back over the layers, flip back over and cover with plastic wrap. Place in freezer until firm.

When cake has firmed up some, remove from freezer and place the first half on a cake plate, cut side up. 


Spread lemon curd over the entire surface, 


then place the remaining half on top, cut side down.


Prepare your glaze by mixing the powdered sugar with just enough fresh-squeezed lemon juice to make a glaze with a good spreading and drizzling consistency. You don't want it to be too thin, but not nearly as thick as a traditional frosting, either.

Spread glaze over the top and drizzle over the sides. Garnish with lemon peel curls and thin lemon slices. 


Allow glaze to set before cutting into cake.


If your family is anything like mine - and thankfully my mom was visiting to help out with the tasting, be prepared to have most of the cake eaten in one sitting. (I did help, too. Quite a bit.) They loved this cake and said it was almost as good as my four-egg cake, and it was so close it was almost hard to tell.


Enjoy!


Tuesday, February 8, 2011

Mama Me's Four-Egg Cake


I can't even begin to describe how happy it makes me to share this recipe with you! It's going to be a long post - with a lot of photos, too, so please bear with me. I'm excited! I was literally dancing around the kitchen and shrieking and singing and jumping up and down when this finally worked out. I have worked a total of at least 50 hours over the last two years (since we went gluten-free) of trying different flours, blends of flours, measurements of xanthan gum, no xanthan gum, baking powder amounts, liquid amounts, baking, crying, baking, sighing, baking again ... until at last I FINALLY have it!


I have to give a HUGE shout-out and THANK YOU to Shauna James Ahern and her husband Daniel Ahern over at Gluten-Free Girl and the Chef for making this possible. Reading through her posts on weighing versus using measuring is what made this happen, and I'll explain more about what I did in a minute.

The Joy of Cooking (1975 edition) recipe for "Four-Egg Cake" has been my go-to cake for nearly every birthday cake I've ever made. My mom always used it (we adapted it a little, mostly omitting the need for beating the egg whites separately -- I found little to no difference in doing this after several tries each way), and I followed. It's so versatile with a buttercream frosting and other ways. My preference is to make a round layer cake with it, but I've also made it in larger rectangular pans. My mom always made great shaped cakes using this recipe. She'd make a large pan of it and then cut the shapes desired to make character cakes or anything else.

I have to also note that this is such a great all-purpose cake for so many occasions. My husband isn't a huge chocolate lover, though he'll tolerate it in some things, and I've made this for many a Valentine's Day. A raspberry filling with a pink frosting and hearts on top is perfect! This recipe is also very close to the cake we had at our wedding.

When we went GF, of course I had to try this cake without gluten. I tried so many different ready-made flour blends and blends of my own, aiming for just the right taste, moisture, texture. I finally got the taste, texture, moisture down perfect. Perfect crumb. But it fell in the middle. Every. Single. Time. I adjusted the amount of dry ingredients, leavening, liquids ... again and again and again ... and again. It fell every time. Whenever I would try a flour blend that baked a perfect-looking cake that didn't fall, it didn't taste the same. It was too grainy/gritty, too dry, too crumbly, whatever. I finally just pretty much gave up hope of ever finding a way to prevent the falling because I'd gotten it to taste so good and it was the top cake request for even gluten-eating friends.

That particular way was using Pamela's baking & pancake mix with many changes to the rest of the ingredients in the original recipe. It wouldn't fall as badly as it did the first time I made it taste good and it fell sooo badly, but it would still fall.

This is the first cake I made to taste great with a great texture, but it just cratered, big time (and keep in mind I wasn't taking photos with blogging in mind at the time):


Thankfully, this was for a dolphin-themed party. I was able to (kind of) make the crater look like a deeper part of the ocean where dolphins were actually jumping out of it. It made it not so noticeable.

Then I played with the ingredients more and more, and more, and was finally able to get it to where it fell, but not quite so deep and not quite as big of an area. And I learned to fill the frosting really thick to cover it some. Have you ever noticed that cake and ice cream photo on the top of the page? Look real close and you can tell that the frosting is thicker toward the middle. It's hiding the crater. Here's another look without the writing over the photo:


See what I mean?

Here's another just like it, without the cut (a polka dot cake was requested). Looks pretty level, right?


I promise as soon as I cut into it, it sank. Tasted fabulous, but it was held up with frosting.

Then I found another way to cover it up and use a little less frosting (though you can still see a little bit of a dip on the round cake) by making a sheet of buttercream fondant and cutting Charlie Brown's face out to cover the cake.


I'll go ahead and show off some photos of these cakes in case you are searching for ways to make a Peanuts-themed party and are having trouble finding party supplies and ideas like I was at the time. (It was a Charlie Brown-themed party, and it was my first attempt at making buttercream fondant, or using it. I think it turned out pretty well, but Charlie Brown and Snoopy did look like they'd eaten a little too much cake! By the way, the rectangular cake was a Namaste chocolate cake mix. Both my regular four-egg cake and a chocolate cake were requested at this party.)


So I figured out that fondant could help some, too. And went back to spreading the frosting really thick in the middle, and sticking things in the middle so it wasn't as noticeable:


Until now.


This cake doesn't have extra frosting in the middle because it came out just fine!

As I said earlier, I have gluten-free girl and the chef to thank. I had been reading this post before Christmas: http://glutenfreegirl.com/gluten-free-holiday-baking-2010/ and decided to buy a digital OXO scale (I have the 5-pound in white, but will probably need to move up to the heavier one at some point. I like the pull-out display) right after Christmas and give this baking by weight a try. I had a feeling it could be the answer to the dilemma with my four-egg cake. By the way, they also have a newer post on the subject at this link and the muffin recipe I still want to try: http://glutenfreegirl.com/gluten-free-whole-grain-muffins/.

It just made sense to me. A cup of any type of wheat flour is going to weigh differently than a cup of any type of gluten-free flour. They all weigh a different amount per cup, so trying to use a measuring cup recipe in a case as exact as cake probably isn't going to turn out perfection.

So I got out my calculator and furiously scribbled on a sheet paper. I swear to you I did more math figuring this recipe out than I have attempted since I took my last math course in college (I was heavy in media, literature and the like. Definitely not math and science). And more scribbling, calculating and nine layers of cake in one weekend later, I had it. I had the perfect gluten-free four-egg cake! Without xanthan gum! I want you to try it, but you will need a scale. The first three layers I made, I tried to measure each flour in a cup after I weighed it. It wasn't exact, and I threw out that idea after that batch, so you'll need one for this recipe.


And a note on the scale, I do plan on using it more and more so you may see more recipes using it in the future. It makes sense. But I also do plan on using measuring cups for a lot of recipes as well, so don't throw out your cups, but do get a scale. (As of right now the only other recipe I have here using a scale is for the gluten-free roux for your gumbo.)

As I stated above, I found the best crumb and taste for this cake came from the Pamela's baking & pancake mix, it just always fell. So I used the same flours that mix uses, I just had to play around with the amount of each. And now, I am proud to give you the recipe as adapted from the Joy of Cooking.

*Please remember that I've worked very hard on this recipe and it is copyrighted, so if you decide to use it, print the ingredients for your personal use or share the link with anyone, make sure the source is with it. Thanks.

Projected prep time: 20 minutes (ingredients should already be at room temperature); Projected bake time: 25-30 minutes
*Have all ingredients at room temperature before starting
139 grams brown rice flour
36 grams white rice flour
86 grams almond flour (might be called meal, should be finely ground)
38 grams sweet rice flour
38 grams tapioca starch
37 grams potato starch (not potato flour)
2 1/4 tsp. gluten-free, aluminum-free baking powder
1/2 tsp. salt
1 cup unsalted butter
2 cups sugar
4 eggs
1 cup milk
1 tsp. pure vanilla
1/2 tsp. pure almond extract

Preheat oven to 350 degrees. Grease and then line the bottoms of three 9-inch round pans, or a larger pan if you are wanting a larger cake. (Grease pan and then put paper down so the paper will stick.)

Sift baking powder and salt together with flours. 

Cream butter until soft, gradually add sugar and cream until light, scraping bowl occasionally.

Beat in, one at a time, the eggs.

Add extracts, blend in.

Add flour mixture to butter mixture alternately with milk, in three parts.

Stir or blend at low-medium speed until smooth (don't want to mix too much or too little) and scrape bowl to make sure it's all incorporated. Pour equally into your three 9-inch round pans (or a larger single pan). Drop onto counter a few times to release some of the air bubbles. Bake at 350 degrees until done, depending on size of pan. For 9-inch rounds carefully check (without opening oven if you can) at 20 minutes. It will probably be closer to 25-30 minutes. More for larger pan, check at 30 minutes. Cake is done when bounces back when pressed lightly and toothpick inserted in center comes out clean.


Cool the cakes in the pan on a wire rack and then carefully turn them over onto a large sheet of wax paper (each layer should have it's own sheet) and carefully fold the paper over the cake, then slide into a freezer ziploc bag and lay flat in the freezer. If you are working with a larger pan, use freezer paper to carefully wrap the cake and then freeze flat.

Freezing it makes it firm and easy to frost and/or cut later.


Everyone decorates their cake differently, but this is how I find it easiest. You can find my buttercream frosting recipe in this link. It's my favorite frosting to use with this cake.

When you are ready to decorate, put some frosting on your cake plate to "glue" it down. At this point in the day, I'm working with bad lighting:


Then put your first layer of frozen cake down:


And more frosting:


Spread it:


Add your second layer (Note that this cake was just two layers because we had to sample the third layer of to make sure it tasted okay. I do like to make three layer cakes, and if you are doing so, just repeat for your third, last layer):


Top your last layer (second or third, or more if you're going higher) with more frosting than the one below it: 


Spread it out


And, if you are decorating the top, you'll want to smooth it out. If not, don't worry so much about getting it smooth. If you are crumb coating first, you'll want a thin layer first and then a thicker layer. I find I don't usually need to crumb coat when working with a frozen cake. I was decorating the top, so I smoothed it out:


Clean up the cake plate and then add your finishing touches.


I messed up some on the writing because I thinned the writing icing out too much, which ended up making it bleed onto the rest of the cake by the next day:


I hope you enjoy this cake as much as my family (and myself!) and our friends do. It really is incredible, and I am so THRILLED to finally have it coming out the way it should!


Enjoy!


LinkWithin

Related Posts Plugin for WordPress, Blogger...