Showing posts with label pasta. Show all posts

Wednesday, February 29, 2012

Wicked Good Mac and Cheese


Happy Leap Day! Do I have any Mitford fans among my readers? (I know at least one is in my sweet friend Ginny.) I could get lost in Mitford any time, day or night. And have ... many times over. I'm a huge Jan Karon fan and have read every single "Father Tim" book available and some of her children's books, too.

So it comes as no surprise that I also have her Mitford Cookbook & Kitchen Reader and flip through the pages often - if for no other reason than to relish a bite of Mitford in my mind for a quick pick-me-up to my mood.

If you are familiar with Mitford, then you also know what a very good cook Puny is. This macaroni and cheese is adapted from Puny's recipe found in the above-mentioned cookbook. I've altered it to fit the needs and tastes of my family. I named it "wicked good" because it's quite wicked with its richness and unbelievably good in its taste. It's not healthy by an stretch of the imagination, but I like to think it's better for you than the old baked mac and cheese version I used to make with Velveeta and other cheeses. Maybe.

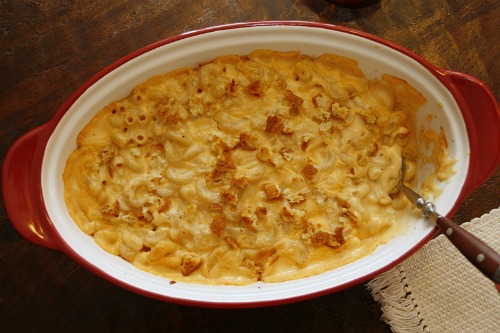
The girls had been asking for macaroni and cheese for a while recently - it had been quite a spell since I'd last made any form of it - so I decided to make it for our Valentine's Day entree. Obviously I didn't take the time to make great photos out of this dish - but I wanted you to see the new casserole dish my sister gave me for Christmas. Isn't it sweet?


Projected time, start to finish, a little over an hour
(Printable Recipe)

1/3 cup unsalted butter, plus a little extra
1/3 cup brown rice flour
3 cups milk
1/2 cup sour cream
4 ounces cream cheese, cut into pieces
2 tsp. kosher salt
Pinch ground nutmeg
1 1/2 tsp. dry mustard
Pinch cayenne pepper
1/4 tsp. black pepper
4 cups shredded Colby jack cheese
1 pound gluten-free elbow macaroni or shells, cooked al dente according to package (I used Tinkyada, and always use the energy-saving method. It works best)
2 slices fresh bread (I used Udi's multi-grain), broken into small pieces

Preheat oven to 350 degrees. Grease 3-quart baking dish and set aside.

Cook pasta according to package, drain and set aside when finished (you might want to lightly toss in a little olive oil). You'll want to keep the pasta a little al dente, so check it several minutes earlier than the package says to cook it for.

While pasta is cooking, combine 1/3 cup of butter and brown rice flour in a large saucepan over medium heat.  Whisk until smooth, then slowly add milk. Continue to stir with whisk until mixture is smooth and thickened.

Add sour cream and cream cheese, whisking in until combined and smooth again.

Add salt, nutmeg, mustard, cayenne and black pepper. Whisk lightly until mixed well. Stir in shredded cheese.  Season more to taste if necessary.

Add macaroni to cheese mixture and gently mix together. Pour into baking dish.

In a small bowl, melt a tablespoon or two of butter and toss with bread pieces. Sprinkle over top of macaroni.

Bake for 35-40 minutes, or until bubbling nicely.

Enjoy!

On another note, today's photo of beauty is actually from last night. Yesterday's post mentioned how terrible the dust and wind were yesterday. That is true, but sometimes dusty days bring beautiful evenings with the sun. It covers the sun just enough to give the sky an incredible hue.


Go find beauty today!

Why I'm sharing this: http://mamameglutenfree.blogspot.com/2012/02/beauty-in-eye-of-beholder.html

Monday, February 13, 2012

Chicken and Mushroom Penne with Sundried Tomato Pesto Feta Cream Sauce


If you're wanting to cook for Valentine's Day this year and are still trying to decide what to make, this just might be your dish. It's delicious!

My baby sister graduated from Texas A&M a couple of years ago and her graduation dinner was held at her favorite restaurant nearby, Caffe Capri in Bryan, TX. We talked to them ahead of time about gluten-free needs for several family members and they assured us it would be no problem and they regularly fixed gluten-free versions of a few dishes for patrons who needed them. I am happy to say that we had no problems, and the meal was so delicious that I needed to try to recreate the dish we ate, as living about 12 hours away made it impossible to dine there very often.

The dish they served us was a version of their "bowtie affair" which is described as "bowtie pasta with a sundried tomato pesto, mushrooms & chicken in a feta cheese cream sauce." They served it to us with gluten-free penne. I successfully recreated this dish to the best of my ability last year and don't know why I'm only now sharing it with you. (My cousin has been holding her famous carrot cake recipe ransom for this recipe, so I'm looking forward to now trying to make her cake gluten-free!) I made it again the other night and was once again struck by how delicious the flavor combination is. The whole family loves this dish.

In my version, I make feta cream sauce an all-in-one with homemade sundried tomato pesto (you can buy ready-made sundried tomato pesto but 1. Not all versions are gluten-free and 2. Homemade tastes much better), then serve the sauce over a bed of penne topped with chicken and mushrooms. You could certainly try tossing the pasta with the pesto (say that 10 times fast!) first, then combining the chicken and mushrooms with the feta cream sauce and serving over the pesto pasta.


To save time in preparing all of it, you could make the sauce ahead of time and reheat it. I find it stores pretty well in an airtight container in the refrigerator for a couple of days. The sauce is worth making alone just serve over some type of pasta, even if you don't want the chicken etc.

Projected start to finish: 45 minutes-1 hour (unless you make sauce ahead of time, see above)
(Printable recipe)

Sundried tomato pesto:
1/2 tsp. dried basil (or about a small handful if you have fresh)
2 large garlic cloves, chopped
1 5.8 oz. jar sundried tomatoes in olive oil (if you can only find 8 oz. jar, estimate about 6 oz.)

Feta cream sauce:
1 pint heavy whipping cream (or you could use 1/2 pint cream and a cup of milk to make it less heavy)
1 4 oz. container crumbled feta cheese

Chicken & mushrooms:
1 lb. boneless, skinless chicken breasts or tenderloins, cut into small pieces
1 small onion, diced
1 small package (about 8 oz.) fresh mushrooms, rinsed and sliced
Extra virgin olive oil
Kosher salt
Black pepper

1 package gluten-free penne (I use Tinkyada in these photos. Schar also makes a good one), prepared according to directions until al dente

Cook pasta according to package directions, until al dente. (I like the energy-saving method on Tinkyada's noodles.) When it's finished, rinse with cool water, drain and toss with olive oil. Set aside.

Blend tomatoes (with olive oil they were packed in), garlic and basil in food processor until pesto consistency.

Dice onion and saute in olive oil in large pan while cutting chicken into small (1/2 inch to 1 inch) pieces. Add chicken to onions and cook through. Salt to taste, and add a little pepper at the end.

In a smaller pan, heat sliced mushrooms over medium-low heat and sprinkle just a bit of kosher salt over them. Toss occasionally, and cook only until softened a little from their fresh state.

Heat cream over low-medium heat in a small or medium saucepan and add crumbled feta. Stir often and continue heating until feta is melted and blended with cream. Whisk pesto into cream until blended well. Salt to taste if necessary.

To serve, place penne on plate, top with chicken and mushrooms, then spoon sauce on top.

Enjoy!


Wednesday, July 6, 2011

Multi-Grain Fettuccine


Fresh, homemade pasta is always a treat. It seems to taste even better not only because it is, but because you know that someone worked harder to make it for you.

I've always been impressed with homemade pasta, and was excited - and at the same time a little intimidated - by this month's Gluten-Free Ratio Rally challenge of homemade pasta. Jenn over at Jenn Cuisine is the host for our rally posts this month, so be sure to check out her rally post where she also lists the links to the recipes all the other food bloggers participating this month have posted. There are some really amazing dishes that you don't want to miss out on, including Jenn's tagliatelle with smoked salmon. Oh yum!

Logo designed by Anile Prakash
If you are interested in why I'm involved in this rally each month and what it's all about, check out my first rally post of peach poppy seed bread, where I explain my excitement and reasons for getting involved. I'm learning a lot and encourage you to give ratio baking a try - it gives you the freedom to make a reality nearly any food idea you have in your head. I have a list of the rally posts in their own category in the index.

I was in for some serious work with the homemade pasta challenge. Prior to a few weeks ago, I'd never attempted homemade pasta even with gluten. I'd always wanted to, but never did. And now I was going to make it gluten-free having no firsthand experience with the way it was "supposed" to be done.

I still have a long way to go before any kind of perfection, but I can safely say that I eventually turned out a great-tasting pasta with a good texture that didn't fall apart during or after cooking and didn't get mushy. The entire family agreed it was good stuff.

I learned three major things in this pasta-making challenge:
1. If you don't have a pasta roller, you can forget about your workout that day because you'll get a good one rolling your pasta.
2. It's most definitely worth the extra work
3. I need a pasta roller

You see, without a pasta roller I just couldn't get the pasta rolled quite thin enough to suit me. So you'll notice it's a little thick - though not nearly as thick as the first trial! I ultimately got the best luck rolling it between parchment paper, but it still didn't get as thin as I wanted it. It worked, though, and was definitely edible.


You may also notice that some of the pieces aren't very long. I got careless a few times during my rolling and let the paper bunch up a little and crease. When I tried to peel the pasta off the paper, sometimes it broke along the creased areas. Also, the dough wasn't rolled out in an even length, so I had some short sides.

I called this "fettuccine" but in reality some of the noodles are much wider and some much more narrow than that. (I need a pasta cutter, too!) I cut the noodles using a smaller pizza wheel, but I never have been good at straight lines. I honestly don't think I could draw one if I had a million bucks at stake. Bottom line is, it's pasta. You can cut it/shape it any way you choose. I thought about attempting a ravioli, but I decided I just wanted this to be simple. I needed this to be simple. 

And I wanted to get the true taste of the pasta, so I served it in a simple way without sauce. There will be plenty of time in the future for me to play around with more homemade pasta creations - starting with some of the recipes from my fellow rally bloggers. After I get a roller.

I used Michael Ruhlman's pasta dough ratio of 3 parts flour: 2 parts egg for this recipe (9 ounces flour: 6 ounces egg).

I'm not even going to attempt giving you a projected prep time for this because it's going to entirely depend on whether you have a pasta roller or are using a rolling pin, how familiar you are with making pasta and whether you have kids running through your kitchen, among other things. The cook time will also vary according to how thin you are able to roll your pasta, so I'll only give an estimate.

Multi-Grain Fettuccine
1 oz. tapioca starch (29 grams)
1 1/2 oz. teff flour (43 grams)
2 oz. sweet rice flour (57 grams)
4 1/2 oz. brown rice flour (128 grams)
6 oz. eggs (3 large eggs)
1/4 oz. extra virgin olive oil (6 grams, or 1/2 tbsp.)
1/2 oz. water (14 grams, or 1 tbsp.)

(The topping I used is simply some zucchini sliced into sticks and sauteed in some extra virgin olive oil and kosher salt, and seasoned with black pepper. I placed it on top of the pasta and topped the zucchini with grated parmesan. It was fantastic.)

Sift flours together in large bowl and make a well in the center. 


Add oil, water and eggs into the well and begin to incorporate the liquids into the flour. I used my stand mixer with the dough hook for most of this, but Ruhlman suggests using your fingers to do all the mixing. I did end up using my fingers and hands after most of the liquid was absorbed.


When the dough is at a good consistency, make a disk out of it, wrap it in plastic wrap and let it sit for about 15 minutes.


Cut into 4 equal pieces and roll dough out between two sheets of parchment paper or in a pasta roller as thin as you'd like it. Cut using a pastry cutter or small pizza wheel, or pasta machine.


Have ready a large pot of well-salted boiling water with some olive oil in it, and place pasta into boiling water. Cook until al dente or as tender as you'd like it. My cooking time varied between about 4 minutes to 9 minutes, and all of the pasta held up well.


Drain pasta when finished cooking and then toss with a little olive oil. Top with whatever you desire.


Enjoy!


And don't forget to check out all the other delicious homemade, gluten-free pasta recipes posted in Jenn's post! (And thank you, Jenn!)

Brooke from B & the Boy! made Ravioli w/strawberry filling and chocolate berry sauce
Caneel from Mama Me Gluten Free made Multi-grain fettuccine
Charissa from Zest Bakery made Linguini with smoked salmon and creamy vodka sauce 
Erin from The Sensitive Epicure made Ravioli w/ shrimp, spinach, mushrooms, & cheese filling in browned butter
Gretchen from Kumquat made Vegetable lasagna
Jenn from Jenn Cuisine made Tagliatelle with smoked salmon, peas and parmesan
Lisa from Gluten Free Canteen made Lokshen kugel
Karen from Cooking Gluten Free made Homemade gluten free pasta
Mary Fran from Frannycakes made Pasta with pink vodka sauce
Meaghan from The Wicked Good Vegan made Vegan gluten-free homemade pasta, in creamy artichoke tagliatelle
Meg from Gluten-Free Boulangerie made Fettuccine with sun-dried tomatoes
Pete and Kelli from No Gluten, No Problem made Tortellini
Shauna of Gluten Free Girl made Gluten free fresh pasta
Silvana from Silvana’s Kitchen made Lemon-poppy pasta with tomato, corn and basil
Tara from A Baking Life made Fazzoletti with wild mushrooms and spring onions
TR from No One Likes Crumbley Cookies made Tomato basil pork raviolis

Sunday, April 3, 2011

Creamy Chicken Lasagna (a.k.a. Christmas Lasagna)


I can't even begin to describe how delicious this lasagna is - you'll have to taste it for yourself if you want an accurate assessment. It's good.

I made this for my oldest daughter's birthday dinner. She wasn't sure what she wanted that night, and I'd had my mind on this dish for a while, wanting to try it out. I showed it to her, and she enthusiastically agreed that she wanted me to test it out for her birthday meal. We are all very glad I did. I will also add that the leftovers of this lasagna were just as good, if not better, than the fresh-from-the-oven servings. It also lasted several meals because it's such a rich dish.

And why post this recipe when it's so late after Christmas? Because it's so good, for any time of the year. We didn't make this for Christmas, but with the pretty red, green and white colors this lasagna produces, I'm definitely considering making it during the season. We usually have chili on Christmas Eve with a Thanksgiving-type meal on Christmas day, but this dish is so good I may very well make this our Christmas Eve dinner, or at the very least make it sometime the week before Christmas in the future.

I adapted this recipe from the one here at my dear friend Ginny's blog, Cooking with Chopin, Living with Elmo. You should check her site out - it's filled with yumminess and heartwarming stories.

Projected prep time: 45 minutes; Projected bake time: 30-45 minutes
Chicken filling:
2 tbsp. olive oil
1 large yellow onion, diced
5 cloves garlic, pressed
1 pound cooked chicken, cut in small pieces or shredded (omit if vegetarian or replace with white cannellini beans)
1/2 tsp. kosher salt
1 tsp. dried Italian seasoning
1 10-ounce package frozen spinach, thawed and drained

Tinkyada lasagna noodles

Cream sauce:
2 sticks unsalted butter
1 1/2 cups gluten-free flour blend (I used blend of garfava, brown rice, potato starch, tapioca starch and sorghum flours. Use what you want, just make sure it's a blend that doesn't contain xanthan gum, salt, baking powder or soda)
3 1/2 cups gluten-free chicken broth
1 cup heavy whipping cream
2 cups shredded or crumbled Parmesan cheese
1 1/2 tsp. kosher salt
1/2 tsp. black pepper
Dash cayenne pepper
Handful chopped fresh parsley
1 4-ounce jar of diced pimentos
1 1/2 cups mozzarella cheese
1 1/2 cups Monterey jack cheese

Grease 9x13 baking dish.

Prepare Tinkyada lasagna noodles according to package directions for the energy-saving method (boil for a couple of minutes and then let them sit) until they are al dente. You want them fairly firm. When they are ready, drain and rinse with cold water, then gently toss them with olive oil to prevent sticking and set aside.

While the noodles are cooking, start on your chicken filling. Heat olive oil over medium heat, add onions and cook until clear. Add pressed garlic (or minced garlic) and cook a few more minutes, without browning the garlic.

Add chicken, salt and Italian seasoning. Taste to see if more salt is needed. Mix in the spinach and cook for another 4-5 minutes, then set aside.


Now get started on the cream sauce. In large saucepan, melt butter over medium heat until bubbling. Add flour a little at a time, whisking continuously, until flour is well-incorporated and smooth with the butter.

Add the chicken broth a little at a time, quickly whisking the entire time, until smooth. It may seem to get hard and clump together at first, but if you continue to whisk and stir, it will smooth out. It's worth the little extra work. The end result will be a thicker, soup-type sauce.

Add whipping cream and one cup of Parmesan cheese. Stir in the salt, black pepper and cayenne pepper. Continue to stir until cheese is melted and incorporated into sauce. When you use the sauce, you may notice that some of the flour has settled to the bottom. Just stir it again to incorporate.


Remove from heat and add pimentos and parsley, stirring well. Add more salt and pepper to taste.

In a separate bowl, toss the mozzarella and Monterey jack cheeses together.

Preheat oven to 350 degrees.

Spread a layer of the cream sauce in the bottom of the baking dish.

Sprinkle one cup of shredded cheese mixture on top of the sauce.


Layer lasagna noodles over the cheese, then spread half of the chicken/spinach mixture on top of the noodles. Top the chicken/spinach with one cup of the shredded cheese, and then add about a third of the remaining cream sauce on top of that.


Repeat with another layer of noodles, the remaining chicken/spinach mixture, one cup of the cheese mixture and one-third of the cream sauce.

Spread the remaining noodles in a layer on top and cover with the remaining cream sauce.

Sprinkle the remaining cup of Parmesan cheese over the top.

(*If you are making this ahead of when you are serving it, you can stop at this step and refrigerate it a day before you bake it. Add 10-20 minutes to the bake time if you do this.)

Bake for 30-45 minutes until the lasagna is bubbling, then remove from oven. Let it stand for 10-15 minutes before cutting.


Enjoy every bite!

LinkWithin

Related Posts Plugin for WordPress, Blogger...