Wednesday, September 7, 2011

Thai Fried Bananas


I can't profess to know whether these are "authentic" Thai fried bananas or not, but I can tell you - and my family  will enthusiastically agree - that these are good.

A few years back there was a woman from Thailand who lived in our town and did catering. My husband was at a party one evening where she provided the food, and raved about her Thai fried bananas for a very long time. People knew he liked these bananas, and considered stashing some from other parties they attended so he could have some. I finally got to work in the kitchen to try to recreate them for him. They were good. But not this good. (Or perhaps my memory has faded over time.)

I haven't tried to make these for him since we've been gluten-free. In fact, I'd nearly forgotten about them. When Meg from Gluten-Free Boulangerie, our host for this month's Gluten-Free Ratio Rally (thanks, Meg!), said we'd be doing doughnuts and fritters as our challenge this month, I was really excited. (If you aren't familiar with the ratio rally yet and want to see what it's about, here is my rally page where I have all my ratio rally posts where you can get some explanation. Ratio baking really gives you a lot of freedom!)

Logo designed by Anile Prakash
It was time to tackle gluten-free doughnuts. I'd recreate good old yeast-risen, Krispy-Kreme style doughnuts for my family - or at the very least the fantastic doughnuts from the hole-in-the-wall bakery in a neighboring town. Oh, the visions I had dancing in my head ...

It didn't happen.


I tried. Honestly, I only gave it one solid effort after spending a significant time figuring out the ratio I wanted, comparing it to other non-gluten-free recipes, and then adjusting it as the recipe progressed. It was a big fail.


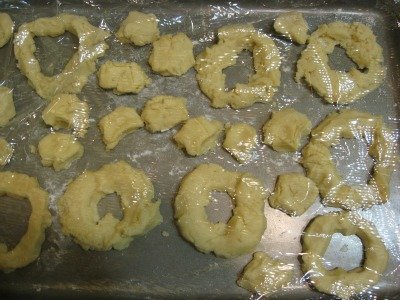

Well, I guess not entirely. The taste was at least good. The texture was bad. Very bad. The dough that I thought would, wouldn't. After it rose beautifully and I rolled it out, cut it (realized it was falling apart waaay too much) and let it rise again, I realized it wasn't going to keep its shape at all. Oh well, it would still make great doughnut holes and misshapen doughnuts. Wrong. It absorbed the oil (yes, it was hot enough and yes, it was deep enough) and became rock-hard. Rock-hard fried grease balls with a doughnut taste. Yuck. (Good thing I started out with a small batch!)


After dealing with some stressful issues not related to my kitchen and being beyond exhausted, I didn't have the strength to try again immediately. I will, though. I will. In the meantime, I'm going to try out some of the oh-so-yummy doughnuts and fritters posted by my fellow rally participants. It looks like Meg even had something similar in mind as my original plan. Yes, please!

So, as I was preparing to move on to apple fritters like the kind you buy in the good bakeries - and NOT the grocery store bakeries, it occurred to me that the fried bananas are a type of fritter, too. And I'm glad I decided to go for those, because they are ever so good, and easy to eat without feeling like you just ate too much sugar after only a few bites. (And I'll be going back to my fritters and attempting the apple at some point, too. Probably before I try the doughnuts again. *Shudder*) They are pretty simple to make. (Always a bonus.)

For this ratio, I went with Michael Ruhlman's recommended ratio of 2:2:1, which is 2 parts flour: 2 parts liquid: 1 part egg.

Projected prep time: 10 minutes; Projected fry time: 2-4 minutes per batch
(Printable Recipe)

1 1/4 oz. (35 g) brown rice flour
1 1/4 oz. (35 g) sweet rice flour
1 1/2 oz. (42 g) tapioca starch
1/2 tsp. kosher salt
1 tsp. aluminum-free baking powder
4 tbsp. shredded coconut
3 tbsp. sesame seeds
4 oz. (1/2 cup) carbonated water
2 oz. (1 large) egg
Scant 1/8 cup (24 g) pure cane sugar
4-5 green (not ripe) bananas (unless you're lucky enough to come across some green "baby" bananas - use those, and increase amount)
Oil of choice, for frying

Pour oil into skillet or electric skillet to a level deep enough for frying and heat to 350-375 degrees. I played with both temperatures and they both did well. I'm a little more comfortable with 350, so that's what I ended up doing for most of them. It takes a little longer at 350, though.

Line a baking sheet or large plate with several layers of paper towels or brown paper.

Sift flours together with salt and baking powder. Stir in sugar.


Add sesame seeds and coconut to dry ingredients, and stir to combine.

Whisk together egg and carbonated water. This will, obviously, get bubbly.


Slice bananas in half to make slices shorter (unless, as noted above, you're using the "baby" ones), then slice in half lengthwise and again, lengthwise, to make four total slices from each half.


Whisk liquids into dry ingredients.


Dip banana slices one at a time into batter, immersing fully, then place in hot oil. Don't do too many at once. Turn over (using tongs makes this easy) when you begin to see them brown on the underside, and fry until a nice brown color.


Remove from oil and place on paper towels for several seconds, then turn over to absorb more oil from the other side.


Serve warm.


Enjoy!


I hope you take some time to check out all the delicious doughnuts and fritters linked up at Meg's post today. My mouth is already watering, and I'm making a list of everything I need to try some of these recipes! Thanks again, Meg!

Thursday, September 1, 2011

Blue Corn Raspberry Muffins, and a Cookbook Giveaway


*NOTE: The giveaway has now ended. Congratulations to the winner, Britt T., of comment #2!

"Mmmm, these muffins are really good, Mommy ... No. They're SUPER-good!" my 5-year-old proclaimed with her first bite at breakfast this morning. I had to agree, as did the rest of the family. The flavor combination in these muffins really explodes in your mouth, and we'll definitely be making them again.


I adapted the recipe from "Corny Raspberry Muffins" out of "The Whole Family Cookbook" by Michelle Stern, founder of What's Cooking With Kids. Do you know Michelle, or know of her? She is one awesome lady. After having her in my Twitter and Facebook world, I had the opportunity to meet her in person at the IACP (International Association of Culinary Professionals) convention in Austin this summer. Her kindness is genuine, and her passion is contagious.

Which brings me to the giveaway I'm sponsoring in this post. "The Whole Family Cookbook" is not a gluten-free cookbook, but many of the recipes are naturally gluten-free and many others are easily converted to be gluten-free (like this muffin recipe). I like the cookbook so much that I want to share it with one of you.

The Whole Family Cookbook: Celebrate the goodness of locally grown foods

Michelle makes the recipes friendly for kids aged 2 and up with color-coded steps according to what's appropriate for each age. She celebrates local foods, and healthy meals, in her book. It's a great cookbook for anyone, even if you don't have a family! She has lots of great tips in the book, as well. Details on the giveaway at the end of this post.


I've been wanting to make these muffins for a while, and I'm so glad I finally did it. I've adapted them to be gluten-free with a few other changes. Because muffin batter is fairly forgiving, I decided to go with standard measuring cups for this recipe rather than pull out the scale since I know some of you haven't been convinced of that form of measuring yet. I personally prefer the scale - it's sooo much easier to just dump all the ingredients into one bowl without using various cups! (And I generally get a much better result and crumb by weight than cup.)However, I also meant to weigh how much each cup weighs for those of you who are international or have been converted like I have, and I forgot. I will be making these again, and will note the weight next time and come back to add it.


Projected prep time: 10 minutes; Projected bake time: 20 minutes
Makes approximately 15-16 muffins
(Printable Recipe)

1/2 cup brown rice flour
1/2 cup white rice flour (*Note: you can probably just use brown rice. I'm trying it next time.)
1/2 cup blue cornmeal
1/4 cup almond flour
1/4 cup sweet rice flour
1 tbsp. milled flax seed
1/2 cup packed pure brown cane sugar
1 tsp. baking powder
1 scant tsp. baking soda
1/4 tsp. kosher salt
1 1/4 cups vanilla yogurt
3 tbsp. organic canola oil
Zest of one large lemon
2 large eggs
1 cup fresh raspberries, washed and drained
1/2 tsp. organic pure cane sugar, plus a little extra for sprinkling

Preheat oven to 375 degrees and line muffin tin with baking cups or grease tin.

Measure flours, cornmeal, brown sugar, baking powder, baking soda and salt into a large bowl. This is a good step to be done the night before if making in the morning.


In a separate bowl, mix yogurt and canola oil.

Add lemon zest to dry ingredients.


Lightly beat eggs in a small bowl, and add to yogurt and oil, stirring to combine.

In a small bowl, mix raspberries with 1/2 tsp. of sugar and set aside.

Pour yogurt mixture into dry ingredients and stir just until blended. The batter will immediately begin to rise from the baking soda.

Spoon batter into baking cups or greased muffin tin, then spoon a few raspberries into each cup. Sprinkle a few grains of sugar onto tops of each on the batter.

Am I the only one who has raspberries fall apart after gently washing them?
Bake for 20 minutes, or until muffins bounce back when you touch them gently in the center.

Cool on wire rack.


Enjoy!


*NOTE: The giveaway has now ended. Congratulations to the winner, Britt T., of comment #2!


Giveaway for one copy of "The Whole Family Cookbook" begins today, Thursday, Sept. 1, 2011, and ends Friday, Sept. 9, 2011 at 12:00 p.m. (noon) CST. The giveaway is only open to U.S. residents, I'm sorry. The winner will be picked through the Random Sequence Generator on Random.org.

You are eligible for up to six entries in this giveaway. To enter:

Leave a comment on this post telling me what your favorite muffin is (only one comment per person will be counted this way).

Additional entries may be earned by (Edit to say: Each one is an entry if you leave a comment for each letting me know):

1. "Like" Mama Me Gluten Free on Facebook (if you already "like" the blog on facebook, that also counts as an entry), then leave a comment here telling me you have done this.

2. Follow @MamaMeGF on Twitter (if you already follow, that counts as an entry), then leave a comment here telling me you've done this.

3. Share this giveaway and recipe on Twitter: "I want to win The Whole Family Cookbook @MamaMeGF! http://bit.ly/qRweEN " and leave a comment here telling me you've done this.

4. Share this giveaway and recipe on Facebook with a link to this post, and leave a comment here telling me you've done this.

5. Subscribe to Mama Me Gluten Free RSS feed, then leave a comment here telling me you've done this. (Edit to say: If you already subscribe, then that counts too - just leave a comment letting me know!)

You must leave a comment on this post for each of things if you want an entry for each one. Only one comment per item per person will be counted. In other words, if you comment more than one time saying you "like" Mama Me on facebook, only one of those comments will be counted, etc.
*Be sure to leave a contact email if you are posting anonymously!


Good luck! :)

Friday, August 26, 2011

Easy Apple Pecan Morning Cake


My girls started the school year this past Monday - the youngest beginning kindergarten. For the first time in 8.5 years, I'm by myself for most of every day. It's bittersweet. (And I've found myself busier than when they were at home!)

I wanted to make a special breakfast for their first day of school, and remembered an apple-nut coffee cake I made out of the Better Homes and Gardens New Junior Cookbook when I was young. My grandparents gave this cookbook to me for a birthday one year - probably the year it was published, and the stained pages are proof I used it often. I remember the thrill I felt when I opened up my own Better Homes and Gardens cookbook.We still have it, on the girls' very own cookbook shelf.

I knew I wanted to recreate that recipe, gluten-free, and a little healthier. It's really simple, and it's so delicious that I made it not only Monday morning, but again this morning - served with poached eggs each time. Yum. It's been a huge hit with the entire family. My youngest, however, insisted that I call it something other than "coffee cake" because it doesn't contain coffee. I tried explaining why it's called coffee cake, but she wants a different name. So be it.

Projected prep time: 15 minutes; Projected bake time: 30 minutes

1 cup Pamela's baking and pancake mix
1/8 tsp. kosher salt
1/2 tbsp. milled flax seed
1/2 cup packed pure brown cane sugar
1/4 cup organic extra virgin coconut oil
1 large egg
1/2 tsp. pure vanilla
1/2 cup sour cream
1 Granny Smith apple, peeled and cut into small pieces

Topping:
1/4 cup packed pure brown cane sugar
 1 tbsp. butter
1/2 tsp. ground cinnamon
1/4 cup pecan pieces

Preheat oven to 350 degrees and grease 8x8 baking pan.

Combine Pamela's mix with salt and flax seed.

Combine sugar and coconut oil in large mixing bowl, mixing well.

Beat in egg and vanilla.

Stir half the dry ingredients into the egg mixture, then add the sour cream. When it's all incorporated, stir in remaining dry ingredients.

Stir in chopped apple. Spread into greased pan.

For topping, combine butter, brown sugar and cinnamon in a small bowl with a fork or your fingers until crumbly, then add pecans and mix in with fingers.

Sprinkle topping on top of the batter and place in oven.

Bake approximately 30 minutes, or until cake bounces back in center.

Enjoy!


This post is linking up with other cake recipes in a #cakelove Blog Hop!

Wednesday, August 24, 2011

Helping Others in Times of Need


I was nearly finished writing this post Monday evening, with a coffee cake post planned for Tuesday, when life threw a curveball - as happens often with children - and the drama in our house escalated to a frenzy. All is well today (just tired!), and no one was ever in harm's way or anything severe like that ... and my curveball seems so insignificant compared to real tragedy that has affected so many, and still is. So, here's the post as written Monday:

There are many, many in this country and in this world who are suffering right now, as always. Times are hard. And times like these allow us to see the goodness in so many others.

We've had natural disasters take lives and homes several times over in the United States and worldwide in the very recent past. Drought and famine are making things hard. Members of the military are being killed or dismembered, and their families are struggling not only with emotional upheaval but wondering what step to take next in providing for themselves. And we learn of tragedy striking a familiar face or name - someone we've never met by name but they run in the same circles as mutual friends, or they are in our social media world.

And we hurt for them. And we reach out to them, as we should. People we've never met. We want to help them, comfort them, pray for them. We give to organizations coordinating relief efforts. We give to funds and bank accounts set up for children and families. We give to our churches to coordinate and pass the money on to where it's needed in our communities and elsewhere.

I'm not one of those people who believe everyone should be forced to give to and help others. I'm one of those people who believe that most individuals have feelings, and are moved to compassion and a desire to help when they can with what they can and are glad they are free to do so. And that many times, this brings them to voluntarily give much more, and more often, than if it was forced out of their pockets. And if they aren't able to give monetarily, or even donate clothes or household goods, they willingly give what they can through prayer.

This is why I have written similar posts regarding help or prayer for those in need a few times in the past. I've felt the need tugging on my heart and felt compelled to share. This is one of those times. A non-profit organization called Bloggers Without Borders has recently launched in an official capacity to help others in need, and I feel like there couldn't be a more perfect time than now to let everyone know about this blogger-based charity.

Most of you by now have heard the story of food blogger Jennifer Perillo and how she lost her husband to a heart attack recently. She and her two young daughters are starting down a new road in life, and need our prayers. The food community showed their support for her over the last two weeks as thousands of peanut butter cream pies were made around the world.

Several bloggers were working together to start a fund for Jennifer and her family, and announced the details today (Monday). If you would like to donate even a very small amount to this fund, you can read the details in this post, or you can click on the button below. (They say that unless you specify in the transaction, all funds collected will go to the #afundforjennie campaign.) If you want to know more about Bloggers Without Borders, you can visit their site. And if you aren't able to donate, please keep Jennifer and her family in your thoughts and prayers, along with the others who have lost loved ones.

Donate to Bloggers Without Borders

Wednesday, August 17, 2011

Creamy Peanut Butter Pie, and Living a Musical Life


Creamy peanut butter pie. A dessert I've never made ... until now. Last Tuesday Jennifer Perillo told us what we could do to honor the memory of her husband, Mikey, as she and her family, and friends, gathered in remembrance of his life last Friday. His favorite pie was creamy peanut butter pie, and she gave us the recipe, telling us we could make one for those we loved and enjoy it with them on Friday. (For those of you who didn't read my post about this and haven't seen all the photos, tweets and posts regarding this, Jennifer is a well-known food blogger who suddenly lost her husband to a heart attack a week and a half ago.)

When I read her post, it reminded me that I hadn't made an apple pie in a long time. My husband loves apple pie. We had a crazy week, just coming off of vacation and having soccer camp, and leaving again in a few days, but I knew I wanted to make an apple pie for my family. I made the quicker version, a French apple pie, so I didn't need to make and roll out crusts. It was worth enjoying it with them in the moment. (I'll share that recipe another time.) Make a pie for those you love, give them a big hug and enjoy the moment.

*Edit 8/22/11: Please see the note at the bottom of this post if you'd like to help out with donations. A fund has been set up for Jennifer and her daughters.


I was traveling on Friday, and out of town all weekend - so wasn't able to make the peanut butter pie on the day most of you out of there were making it. I made it on Monday instead, and said a prayer for Jennifer and her family as I prepared the pie, and again as we've eaten it. I'm once again in awe - and proud - to be a part of this amazing food community. Hundreds, most likely thousands, of individuals made their version of peanut butter pie for Mikey on Friday, or in the days since. One only needs to go to Twitter and search for the hashtag #apieformikey to see an incredibly overwhelming stream - even today - of peanut butter pies, for Mikey and Jennifer. A visit to food photo sites such as Tastespotting and Foodgawker will show hundreds of gorgeous peanut butter pies. Todd Porter and Diane Cu, from White on Rice Couple, created an amazing video of making their pie, with quotes from others.

I mentioned above that this is the first time I've made peanut butter pie. I don't know that I've ever even eaten a piece of the dreamy concoction - although I've seen them around. Unless peanut butter is consumed with a good amount of chocolate, I've never cared for the stuff. I don't even keep it in the house (love almond butter). When I was pregnant with my oldest, I had an intense craving for peanut butter chocolate cups over a period of weeks. I got to the point where I started making my own chocolate peanut butter balls rather than have my husband go to the store, yet again, to buy me peanut butter chocolate cups. I guess my aversion to peanut butter unless it's paired with chocolate has just naturally made me shy away from this pie. Never again. This pie reminds me of those peanut butter chocolate cups, and I love it. It's that good.


My youngest daughter (just turned 5 years old) lives in a musical. She breaks out into song about everything - things that make her happy, sad, angry, you name it. She is like Frances the badger every day. I've always enjoyed watching musicals, but my husband has not. He would say it wasn't realistic - people don't live like that, just breaking out into song. Until our youngest became more vocal. He actually enjoys some musicals now, and realizes that some people really do break out into song. When she was eating her peanut butter pie last night, the second night in a row, she proclaimed that it was the "good pie ever." I asked if she meant the best pie ever. "Yes!" she exclaimed, and broke out into song about the peanut butter pie:

     "Peanut butter pie ...
     has cream in it ..........
     so does pumpkin, on toooop ...
     but this has more ...
     This has cream, peanut butterrrr ...
     I think this one winssssss ....
     Has peanut butter, cream ...
     eat it every day ... everywhere ...
     You put chocolate in, peanut butter
     and chocolate ..........."


I can learn a lot from my youngest. I want to slow down and savor each moment with those I love. I want to break out in song, sing along with those who do - or at least stop and listen to the music. It's savoring those moments that Jennifer Perillo wanted us to get out of making peanut butter pie in memory of her husband. She wanted us to slow down and enjoy life, in that moment.

In Jennifer's recipe, she makes the crust from chocolate cookies. There are certainly gluten-free chocolate cookies out there that you can use, but this cocoa almond flour crust I made worked perfectly for our needs. Covering it with the melted chocolate made it hold together very well.

Projected prep time: 20 minutes; Chill time at least 3 hours

Crust:
1 rounded cup almond flour
2 tbsp. unsweetened cocoa powder
3 1/2 tbsp. organic pure cane sugar
2 1/2 tbsp. melted butter
1/2 cup semi-sweet chocolate chips

Filling:
1 cup heavy whipping cream
8 ounces cream cheese
1 cup organic peanut butter, creamy style
1 1/2 cups powdered sugar (*see note below)
1 14-ounce can sweetened condensed milk
1 tsp. pure vanilla
1 tsp. fresh-squeezed lemon juice
Chocolate, for garnish

Sift almond flour, cocoa and sugar together in small bowl then stir together with butter until moistened. Press into bottom and up sides of 9-inch pie pan. (Note: Jennifer's original recipe says to use a springform pan. I wish I'd pulled mine out or used my deep dish pie plate. It worked fine in the regular, but I had a little left over that would have overflowed if I'd put it all in there - I just ate it with the spoon.:) )


Melt chocolate in microwave 45 seconds then stir, and melt for an additional 15 seconds if necessary. Carefully spread melted chocolate over the bottom and up the sides of pie crust (it helps if you have a little, flexible spatula for this). Place in refrigerator while making the filling.


Pour cream into mixing bowl and whip until stiff peaks form. Place in refrigerator while preparing the rest.

Place cream cheese and peanut butter into large mixing bowl and beat until light and fluffy.

(*Note: I used organic peanut butter that was "creamy" style and only had sea salt added to it. It wasn't nearly as creamy as some of the other brand name creamy peanut butters out there, and wasn't sweet since it had no sugar added to it like some of the others. I added a 1/2 cup more powdered sugar because of this, but feel free to add more or less if your tastes require it. I also used my mixer's wire whisk while beating it to try to break it up more.)

Reduce speed and gradually beat in the powdered sugar, then add the condensed milk, vanilla and lemon juice. Increase speed and beat until all the ingredients are combined and smooth.


Stir in about 1/3 of the whipped cream into the peanut butter filling, then carefully fold the remaining cream into the filling.


Pour filling into the prepared pan, and refrigerate for three hours, or overnight, before serving. *Note: I ended up freezing it about an hour and a half before cutting and serving, to have more uniform slices than what I was getting just from refrigerating it. I ended up storing it in the freezer and cutting the slices, then letting them sit and thaw several minutes before serving.


Garnish with chocolate shavings, if desired.


I hope you make a pie for those of you love, and serve it with a hug.

Tonight we'll be finishing the last of our creamy peanut butter pie. I'm going to sit and savor each bite and enjoy the time with my family, and say a prayer for Jennifer and her girls. I hope our youngest breaks out into song about the pie again - and I'll sing along with her.


*Note 8/22/11: A fund has been set up for Jennifer and her daughters. If you would like to learn more about it, please visit Shauna's post here: http://glutenfreegirl.com/a-fund-for-jennie/

Or, click here (you can specify the fund in the special instructions if you wish):
Donate to Bloggers Without Borders


Tuesday, August 16, 2011

Product Highlight: Kinnikinnick Donuts


Do ever just crave donuts, but don't have the time or energy to make them? How about you, or child, is in a situation where everyone around is going to eat a donut but there aren't any gluten-free ones available? This, for our family, is where Kinnikinnick donuts come in. They are pretty darn good for a gluten-free, dairy-free, soy-free, potato-free cake donut.

We honestly enjoy all of the flavors: Maple, chocolate, vanilla and cinnamon-sugar, but I think maple is my personal favorite. They have come in handy many times in several situations, or just when we are craving a quick snack or something sweet to go with protein at a special-occasion breakfast that I haven't had time to bake much for. They aren't like your yeast donuts, but they are definitely a good replacement for cake donuts.


LinkWithin

Related Posts Plugin for WordPress, Blogger...