Showing posts with label chocolate. Show all posts

Wednesday, October 3, 2012

Pecan Tollhouse Tarts


What say you ... do you choose to make your tarts with a shortbread-type crust or a pie-type crust? Me? I like both.

Even though it's more traditional to make a shortbread crust for many tarts, I went the pie-type crust route for these tarts for the Gluten-Free Ratio Rally. I just really wasn't ever completely satisfied with my incredibly crumbly (but still tasty) pie crust made for the green tomato pie in the pie crust challenge.

I think I may have a winner in this crust. It holds together nicely with a nice amount of crumb. Not too crumbly and even slightly flaky. Great texture and taste. I think I might use this one for the pie baking when the holidays come up. (Is that really beginning in the next month???)

Many thanks to Charissa of Zest Bakery for challenging us to do tarts this month for the rally. Be sure to stop by Charissa's lovely blog and check out her amazing cheddar apple tart. Hello, Fall and hello, yum! I'll be sure to be trying that one (with Colby Jack since I'm allergic to the cheddar I do so adore). When you're there, don't forget to stop by and see the other incredible tart recipes the rally participants have baked up for you this month.

Logo designed by Anile Prakash

If you aren't already familiar with the Gluten-Free Ratio Rally where a group of us experiment with ratios that give us independence in the kitchen, you can check out my rally page here, where I have links to all the rally posts.

I've been wanting to make a Tollhouse pie since we went gluten free four years ago but haven't done it yet. Just as I love chocolate chip cookies, I love Tollhouse pies - it's like eating a gooey mess of warm chocolate chip cookie dough! Making a smaller version into these "tarts" was the perfect excuse to give that pie I'd been missing a try. For the filling, I mostly used a copy I found in my mother's cookbook years ago, but made it a little different by adding some vanilla and switching the walnuts out for pecans.


Because I used a pie-type crust, I used Ruhlman's ratio for pie crust which is 3 parts flour: 2 parts fat: 1 part liquid. I've had success in the past with gluten-free pie crusts using cream cheese, so I used some cream cheese as part of the fat in this recipe. The flour blend I use in this recipe gives a sweeter, nutty taste to the crust that goes well with the chocolate. I used a stand mixer for the crust, but feel free to use a food processor or pastry cutter.

(Printable Recipe)
Projected prep time: 10 minutes for crust; 10 minutes for filling; 40-45 minutes for baking
Note: This crust makes enough for one 9-inch pie/tart or 10 tarts in a muffin tin. If you use the entire filling proportions, you'll have some left over that you can make a shallow crustless pie/tart in.

Crust:
2 ounces butter
2 ounces cream cheese
3 ounces (85 grams) oat flour
1 ounce (28 grams) sweet rice flour
1 ounce (28 grams) millet flour
1 ounce (28 grams) tapioca starch
(Edit to add 2 tsp. ground chia seed if you have it - just adds a little more stick together in there!)
1 ounce (1/8 cup) cold water
2 pinches kosher salt


Filling:
2 eggs
3/4 ounce (20 grams or 1/8 cup) potato starch
1/2 ounce (15 grams or 1/8 cup) sorghum flour
1 ounce (28 grams or 1/4 cup) millet flour
3 1/2 ounces (99 grams or 1/2 cup) organic pure cane sugar
3 3/4 ounces (106 grams or 1/2 cup) pure dark brown cane sugar, firmly packed
1 tsp. pure vanilla extract
8 ounces (1 cup - 2 sticks) butter, melted
1 cup semi-sweet chocolate chips
1 cup chopped pecans

For crust:
Blend butter and cream cheese together into flour and salt using the paddle attachment on a stand mixer (or use a food processor or a pastry cutter by hand) until crumbly, then add the water, continuing to mix just until it begins to come together, then form the dough into a ball.

Wrap in plastic wrap and refrigerate for 30 minutes to an hour.

When ready to use, form into 10 balls about 1.5 inches in diameter and press into muffin tins. Set aside.

For filling:
Preheat oven to 325 degrees. Melt butter and set aside to cool.

In large mixing bowl, beat eggs until foamy.

Add flour, sugar, brown sugar and vanilla and beat well until blended.

Blend in butter.

Add pecans, then stir in chocolate chips.

Pour into crust-lined tins (see note above - if you have extra filling left you can make a crustless shallow pie).

Bake until set, about 40-45 minutes.

Serve warm with fresh whipped cream or ice cream for a real treat, but they taste great cold, as well. Refrigerate leftover tarts.

Enjoy!


Be sure to visit Charissa's tart recipe and check out the other rally participants this month, as well!

Wednesday, April 4, 2012

Triple Chocolate Brownies


Brownies from scratch. Those three words have always made my mouth water instantly, like Pavlov's dog. Brownies from a box aren't bad, but from scratch have always had that extra something that you can't quite put your finger on but you know it's good.

I love that brownies are versatile, full of flavor combinations, possibilities and textures and fairly simple to whip together and bake. They are perfect for any time of the year and nearly any occasion. So I was happy to see that Mary Fran from FrannyCakes, our host for this month's Gluten-Free Ratio Rally, had chosen brownies as our challenge. (Thank you, Mary Fran!)

Logo designed by Anile Prakash

Be sure to stop by Mary Fran's host post of Gluten-Free Hazelnut (Nutella) Brownies (be still, my heart! Nutella!) and drool over her offering as well as all the other amazing recipes my fellow participants baked up for you this month.


I chose to go with chocolate brownies because I felt chocolate was the perfect way to celebrate my one-year anniversary with the rally. I got started the second month into it last year, and I haven't regretted a minute of it. It's been so fun to have my eyes opened to possibilities I never imagined in the kitchen, as well as get to know my fellow rally bloggers a little bit better.

If you aren't familiar with the rally yet, you can learn more at the original introduction post by Shauna at Gluten-Free Girl as well as my other rally recipes that link up to the hosts each month on my Gluten-Free Ratio Rally page. By baking and cooking with weight and using a ratio, you can free yourself to create endless possibilities in your kitchen.

For these brownies, I came up with a ratio of 2 parts sugar: 1part fat: 1 part egg: 1 part flour. I based this from a recipe I created when I was pregnant with my oldest and was home alone for a week in desperate need of some serious chocolate. For this challenge, I played around with the flours and types of sugar and chocolate, and these ratio brownies ended up being less chocolate-y than the original gluten ones from years ago. My husband doesn't care for chocolate as much as I do, so I settled on cocoa powder for the final recipe I'm sharing today rather than the melted baking chocolate the originals call for.

I wish I could say the final product is perfect, but for me to call them perfect they would have a bit more chewiness to them. (Edit: Psssst ... I finally achieved it! See the edit in directions for the chewy perfection! This also gives them an awesome crunchy top.) That being said, however, I think that's all they are missing. If I baked them a little longer, they may or may not come out a little chewier and I might try that next time (tonight, maybe?). They aren't really cake-like brownies but are very fudge-y. I wish they had a little more chew, but I'm still quite happy with the texture and the entire pan was eaten quickly by everyone in the family. They definitely meet all the requirements in my mind for a really good from-scratch brownie taste.


Projected prep time: 10 minutes; Projected bake time: 25-30 minutes
(Printable Recipe)

4 ounces (1 stick, 1/2 cup or 8 Tbsp.) butter (I used salted)
1/3 cup unsweetened cocoa powder (forgot to weigh, will edit next time)
8 ounces pure cane sugar (I used refined sugar for this recipe)
1/2 tsp. kosher salt
1 1/2 tsp. pure vanilla extract
4 ounces eggs (2 large eggs)
2 ounces (56 grams) brown rice flour
1 ounce (28 grams) teff flour
1 ounce (28 grams) potato starch (you can use tapioca here instead but I liked the potato texture a little better)
1 tsp. ground chia seed (I use Salba brand)
2 ounces (56 grams or about 1/3 cup) semi-sweet chocolate chips
2 ounces (56 grams or about 1/3 cup) white chocolate chips
1/2 cup chopped pecans, optional (forgot to weigh, will edit next time)

Preheat oven to 350 degrees and grease an 8x8 baking pan.

Sift flours together with ground chia.

Melt butter in medium saucepan over low heat and cool to lukewarm.

Mix in sugar and stir until smooth. Mix in salt, cocoa and vanilla and stir until well-incorporated.

Mix in eggs until smooth.

Mix in flour blend until smooth.

Mix in chocolate chips, white chocolate chips and pecans.

Spread into greased pan. (Edit: If you want to achieve the chewy factor, let the batter sit in the pan for a minimum of 30 minutes, preferably an hour, before baking. Then try to let them cool before cutting them - they will be great!)

Bake for approximately 25-30 (they'll be a little chewier at 30 minutes) minutes or until done. For best results, let cool before cutting. (But they are good hot and gooey!)

Enjoy!


Please don't forget to stop by Mary Fran's post to see her delicious brownies, as well as all the other amazing brownies baked up by the participants this month! Just look at this list - how can you not be hungry for brownies right now? Thank you, again, Mary Fran!

Adina from Gluten Free Travelette made Chocolate Brownie Pie with Orange Zest
Angela from Angela's Kitchen made Gluten & Dairy Free Cream Egg Brownies
Brooke from B & the boy! made Triple Chocolate Brownies
Caitlin from {Gluten Free} Nom Nom Nom made Peppermint Brownie Bars
Caleigh from Gluten Free[k] made White chocolate and marshmallow brownies
Caneel from Mama Me Gluten Free made Triple chocolate brownies
Charissa Luke from Zest Bakery made Slutty gluten-free brownies
Claire from My Gluten Free Home PB&J Brownie Whoopee Pies
Claire from This Gluten-Free Life made St. Patty's Day Marshmallow Swirl Brownies
Erin from The Sensitive Epicure made Mexican Cocoa Brownies with an Almond & Pepitas Crust
gretchen from kumquat made salted caramel brownies
Heather from Discovering the Extraordinary made Nutmeg Blondies
Irvin from Eat the Love made Blueberry Citrus Marble Brownies
Jean from Gluten-Free Doctor Recipes made Blue Ribbon Brownies
Jenn Cuisine made Grain free brownies with no-bake ricotta cheesecake cream
Jonathan from The Canary Files made Vegan Marbled Banana Walnut Brownies
Karen from Cooking Gluten Free! made GF Chewy Crackled Top Brownies with Raspberry Puree
Mary Fran from FrannyCakes made Gluten-Free Hazelnut (Nutella) Brownies
Morri from Meals with Morri made Oaxacan Brownies & Mesquite Cacao Blondies
~Mrs. R from Honey From Flinty Rocks made Black Bean S'More Brownies
Pete and Kelli from No Gluten, No Problem made Caramel Mexican Chocolate Mesquite Brownies
Rachel from The Crispy Cook made Co-Co Nut-Nut Blondies
Shauna from Gluten-Free Girl made Gluten-Free Brownies
Tara from A Baking Life made Mint Chocolate Flourless Brownies
TR | No One Likes Crumbley Cookies Gluten Free Berry Fudge Brownies 

(And for my photo of beauty today, I'm sharing another bluebonnet photo from my neighbor's gorgeous crop. Can you find the ladybug? I love all the blue surrounding me this time of year - I hope you are finding the beauty surrounding you!)


Why I'm sharing this: http://mamameglutenfree.blogspot.com/2012/02/beauty-in-eye-of-beholder.html

Thursday, February 9, 2012

Chocolate Covered Cherry Cream Cheese Cupcakes


I love chocolate-covered cherries. Do you? They are one of my dad's favorite candies and I have many fond memories of him sharing one of the sweets with me out of the special box in his stocking on Christmas Day or at his place on the table on Valentine's Day.

As I was trying to think of what to share with you this year (I already shared my chocolate covered cherry cookies and love story last Valentine's Day, and my favorite rolled and cut cookies to make into hearts for Christmas and St. Patrick's Day), I thought back to this chocolate-cream cheese cupcakes recipe my dear friend and college roommate Ginny posted last month.

Those cupcakes! When I saw her post, I was instantly transported to a time in my younger years when a friend's mother made cupcakes, only miniature, nearly identical to these on special occasions. I would pop them whole into my mouth and never got sick of them. I have that recipe and have made it a time or two and it's very similar, but there are a few differences - namely it is from scratch and doesn't use an easy cake mix.

With everything going on these days and my oldest daughter's birthday a couple of weeks ago and needing cupcakes for her class, I thought I'd make these super-easy delights that Ginny shared. Even the boys in third grade wanted the recipe.

The other day as I was mulling over what to fix for you this Valentine's Day, it occurred to me I should combine chocolate covered cherries into these amazing and simple cupcakes. Win!


In case you're wondering, Cella's chocolate cherries are gluten-free. And they happened to be on sale last week in my grocery store.

The combination was fantastic, and everyone loved these cupcakes. I hope you do, too.

Projected prep time: 15 minutes: Projected bake time: 25-30 minutes
Makes 24 regular cupcakes
(Printable Recipe)

1 box or bag gluten-free chocolate cake mix (I used Pamela's chocolate cake mix which is 21 oz.)
Ingredients required to prepare chocolate cake mix according to original recipe directions on bag (eggs, oil or butter, water or other liquid, etc.)

Filling:
12 gluten-free chocolate-covered cherries (Cella's brand is gluten-free), chopped into small pieces
1/4 cup semi-sweet chocolate chips
1 8-oz package cream cheese
1 large egg
1/3 cup organic pure cane sugar
pinch of kosher salt

Preheat oven to 350 degrees and line cupcake tins with baking cups. (If you are using a gas oven, top rack will be best on this recipe.)

Chop chocolate cherries, save as much of the liquid as possible.


Place in bowl, liquid filling and all. Add chocolate chips. Set aside.


Beat cream cheese together with sugar, egg and salt until creamy.


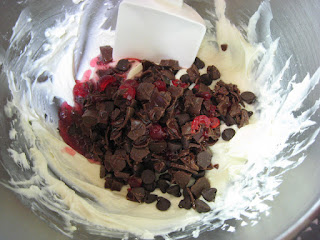
Fold the chocolate cherries and chocolate chips into the cream cheese mixture.


It will have a lovely light pink color that won't stay through the baking, but it's okay. Set aside.

Drop chocolate cake batter into baking cups about 2/3 full.


If you want to attempt hearts on top of the cupcakes, place two spoonfuls slightly apart to make a heart shape on top of the cake batter. This will spread some and not keep the nice shape as much, but it's fun to try. I tried other ways, including filling a heart-shaped cookie cutter on top of the batter, to no avail. This spoon method worked best. If you don't want to mess with it, just drop a whole tablespoon onto the top of each.


Bake at 350 degrees for about 25-30 minutes or until the center is completely cooked. Cool on wire racks.

I found that what wasn't eaten within a few hours kept best in an airtight container in the refrigerator.

Enjoy!


Thursday, February 24, 2011

Gluten-Free "Thin Mints"


My oldest daughter started Girl Scouts this past fall, and the minute she did I knew I'd have to make some copycat cookies gluten-free in our favorite flavors: Thin Mints and Caramel deLites (Samoas).

When we went gluten-free a couple of years ago, I actually called the corporate Girl Scouts office and asked them about the possibility of selling a flavor or two in gluten-free options. I got a vague "we'll look into the demand" (hint, hint, if anyone reading this is higher up in Girl Scouts) and immediately knew by the time my oldest requested to join, there would be no such option.

She started selling the cookies a few weeks back, and I got the thin mints made that first week. The verdict? Amazing. Waaaayyyy better than the originals. I hope you'll agree.

I made the Caramel deLites this past weekend, and hope to post that recipe tomorrow or this weekend. (Edit 3/2/2011, here it is.)

I adapted these "thin mints" from this recipe on Food.com.


Projected prep time: 3 or more hours (includes chilling); Projected bake time: 10-12 minutes
Cookies:
1 15 oz. package of gluten-free chocolate cake mix (I used Betty Crocker because I had some on hand and it was that size. If you use another brand and have a scale, weigh out 15 oz.)
3 tbsp. butter, melted
1/2 c. Pamela's bread mix & flour blend (not baking mix)
1 egg at room temperature
1/2 to 3/4 tsp. pure peppermint extract
Water (I think it was about 5 tbsp. The original recipe called for 3 tbsp. but it wasn't nearly enough, so I added a little more. Star with 3 and add more a tiny bit at a time until you have a stiff dough that is workable. You don't want it crumbly at all, but you also don't want it too moist. It needs to be very stiff.)

Coating:
1 12 oz. bag semi-sweet chocolate chips (gluten-free, of course)
2 tbsp. shortening such as Crisco (see note)
1 1/4 tsp. pure peppermint extract
1/8 c. more chocolate chips, separate from bag

*Note: I HATE Crisco. I would much rather use butter, olive oil, coconut oil, grapeseed oil or canola oil for all my cooking and baking. Even margarine, which I only use a tiny handful of times a year, I would prefer over Crisco. There is something that is disgusting to me about Crisco, and I have to fight a gag when I use it. So much so, that I'd had an unopened can of Crisco in my pantry for more than a year and I opened it for this recipe. So why did I use it? I wanted this coating to be perfect, and harden nicely without needing to be kept in the refrigerator and melt as soon as you picked a cookie up. I didn't believe butter or oil would work for the coating I wanted, but I may try a reduced portion of this coating just to test without any shortening and see how it turns out. If it works well, I'll come back and edit. If you know of other tricks that will get this same coating I achieved without having to use it, please let me know!


Mix dry ingredients together in large bowl, then remaining ingredients (your egg should be room temperature so it doesn't harden the butter) and mix together, adding water last. Add a little more water as needed, as noted above, until you achieve the right texture. Using a stand mixer with the paddle attachment, as for all heavy cookie doughs, makes it easier. I should have taken photos of the dough when it was finished so you could get an idea of the consistency, but it just looked, ummm ... not very yummy to say the least.

Roll dough into a log, wrap in plastic wrap and refrigerate for at least 2 hours. I refrigerated overnight. Note that this didn't make the most beautiful round cookies. When I cut the dough from the log, each slice was flattened some even though I used a sharp knife. If you want perfect circles, you'll need to either try freezing the dough before cutting, or rolling it out and then cutting circles.

Preheat oven to 350 degrees.

Remove log from refrigerator and cut, with a sharp knife, into approximately 1/4-inch slices and place on baking sheets lined with parchment paper.

Not perfect circles, as noted above, but it takes less time (a plus for a busy mom!) and they do look better once baked and coated.
Bake for 10-12 minutes. You want them to be crispy (but not burned!) when they are cool, so you may want to bake a few and let them cool to gauge baking time.

Let them sit on baking sheet for a couple of minutes before transferring to wire rack to cool completely.


When the cookies have cooled completely, line the baking sheets with wax paper (stick them in the freezer if you have room, or the refrigerator) and start on the coating.

Place chocolate chips and shortening in a microwave-safe bowl and melt on high for one minute. Remove, stir and microwave 10 more seconds. Stir until smooth, then quickly add 1/4 tsp. of the extract at a time, stirring quickly and very well after each addition. Continuing to stir very quickly, add the 1/8 cup more chocolate chips and stir until smooth. It won't be a real thin coating, but it shouldn't be too thick to stir easily, either.


If you were able to make room for the sheets in the freezer or refrigerator, that will help keep the chocolate from spreading when you place the cookies on the sheet. If not, it's fine, but the chocolate may spread out a little from the cookies when you place them on the sheets after coating them.

Dip each cookie into the chocolate and then shake and/or scrape off excess. You will want to scrape off the excess, but still leave a thin coat completely covering the cookie. It will be thicker than it looks when set. If you are doing this the sanitary and/or less-mess-on-your-hands  way, you'll use a couple of pairs of tongs, or a pair of gloves. I tried the tongs for the first several cookies, but tired of it and since it was just our family and my hands were clean, I started using my fingers to hold the cookies.


Set cookies on sheets and allow to sit until coating is completely hardened. To speed up this process, you can place them in the refrigerator or freezer. I found this coating hardened pretty well on its own.


Store in an airtight container in layers of wax paper. If you use this coating recipe, you shouldn't need to keep the cookies in the refrigerator.


Enjoy!

Monday, February 14, 2011

Chocolate Covered Cherry Cookies, and my love story ...


Happy Valentine's Day, everyone! Shauna James Ahern over at Gluten-Free Girl and the Chef has encouraged people to share their love stories on this day. She is compiling them for today, and I already shared mine over there, but thought I better share it with you, as well. Included with our story is a recipe for chocolate covered cherry cookies. They are a perfect Valentine cookie, but they are also especially good at Christmas or any other time you are craving cherries and chocolate. I hope you enjoy them!

My husband and I dated for four years before we married. I was in college when we started dating, but he had already graduated. He moved to a town four hours away the second year we were dating, but we kept things alive with many phone calls and a visit once a month or so. The third year, he joined the military. It was very hard - we saw each other only once in a time of almost a year while he was literally across the country in basic training and then AIT. The phone calls were few and precious, but there were many, many letters. We got to know each other even better that way.

The fourth year, we were together again. In the military, he had ended up choosing a field of training in technology that ultimately became a very wise decision because a couple of years later, he was employed in a job where he used that exact training and still has that job today.

Our strong relationship was put to the test when I became pregnant with our first child, and lost that baby in the beginning of my second trimester, right before Christmas. I kind of lost it for a while and the depression was unbearable. I have a strong Christian faith, but that was challenged with the "why's" and I was very angry with God at the time. I had an extremely demanding, stressful job as a newspaper reporter but until then I'd loved my job. I started losing the passion for my work, though, along with nearly everything else. Everything seemed to be falling apart, but my husband was my rock. He stood by me through the darkness and my anger and resentment at the world and encouraged me to get some help, which I ultimately did.

I became pregnant with our second child, our oldest daughter, and had complication after complication from the beginning of the pregnancy. She was due a little after Valentine's Day, but after being on strict bedrest for two months due to pre-term labor, she was born a month early and was such a tiny little thing. When Valentine's Day came, my husband bought her a little Valentine's bear covered in hearts (it was about the size of a beanie baby, maybe just a tad longer). She wasn't much bigger than the bear. I took a photo of her asleep next to the bear, and now when people see that photo and then I show them the bear, they are amazed at how tiny she was then.

We have since had another daughter, as well as two more losses, which is why all-too-common infant and miscarriage loss and support, as well as pregnancy complication awareness, are things I am deeply passionate about (along with gluten-free living!). We have been through a lot of things together, both happy and sad, and are even more in love now than we were then.

God has blessed me with this family of mine, and I am very thankful. And that, readers, is my ultimate Valentine. God never promised things would be easy, but he did promise to never leave us. Life still happens and it's hard to believe he's still with us, loving us, when things get bad, but he is. I basically left God for a while (and I hate to say it wasn't the first time), but he continued to love me and didn't leave me, and gave me the gift of my family. My husband and I will celebrate our 11th wedding anniversary next month. I am proud to call him my Valentine, along with our two little Valentines.

And I feel very blessed. Happy Valentine's Day!

I've adapted this recipe from the Buried Cherry Cookies recipe from the Better Homes and Gardens Our Best Recipes cookbook.


Projected prep time (when you don't have a child tugging on your apron strings): 35 minutes; Projected bake time: 9-12 minutes
1 16 oz. jar maraschino cherries, undrained
1 1/2 level cups Pamela's bread mix & flour blend (not the baking mix)
1/2 cup unsweetened cocoa powder
1/2 cup unsalted butter, softened
3/4 cup (level) plus 2 rounded tablespoons organic sugar
1/4 tsp. gluten-free, aluminum-free baking powder
1/4 tsp. baking soda, with a tiny pinch removed
1 large egg
1 1/2 tsp. pure vanilla
1 cup semisweet chocolate pieces
1/2 cup regular sweetened condensed milk

Preheat oven to 350 degrees and line baking sheets with parchment paper.

Drain cherries, reserving juice.


Combine cocoa powder, flour blend, baking powder and baking soda in a bowl.


In separate bowl, beat butter at medium speed for about 30 seconds and then add sugar, beating until mixed. Scrape bowl a couple of times to make sure it's all incorporated.

Add egg and vanilla, and beat again to mix into butter mixture.

Gradually add the flour mixture, continuing to mix at a lower speed until it's all incorporated. The dough will be stiff.

Shape dough into 1-inch balls.


Press down in the center of each ball with your thumb, making a well in the center of each cookie.


Place a cherry in the center of each cookie.


In a small saucepan, combine the chocolate pieces and condensed milk.


Heat and stir over medium heat until chocolate is melted, then stir in approximately 4 teaspoons of the cherry juice.


Spoon a little of the glaze over each cherry, just enough to cover each one. Thin with more juice if needed.

Bake at 350 degrees (top rack if gas oven), and check at about 8 minutes. They may need up to 12 minutes depending on your oven. They are finished when the edges are firm.

Let them sit on baking sheets for a couple of minutes before transferring to wire rack to cool.


Store in an airtight container between layers of wax paper. These cookies freeze well, just let them thaw at room temperature.


Happy Valentine's Day!

Saturday, February 5, 2011

Pomegranate Cranberry Nutella No-Bake Cookies


Today is World Nutella Day. I didn't know that when I made these a few days ago, but I found out a few hours after I'd finished. Naturally, I decided to save the post in honor of this fabulous day. Don't forget about my Bananatella Cream Bites when you're whipping up your gluten-free nutella recipes today!

I'd actually been making these as something for a Valentine's Day option, because what can be better than chocolate, nutella and sweet red pomegranate-infused cranberries melted together to celebrate with your honey?

I adapted this recipe from the "Chocolate Unbaked Oatmeal Cookies" from the Miss Rodeo America Cookbook printed in 1995 that my mother-in-law gave me a long time ago. (She was a Miss Rodeo America.)

Projected prep time: 15 minutes; Projected cook time: 5 minutes
2 c. sugar
1/4 c. unsalted butter
1/2 c. milk (plus more)
1/4 tsp. salt
2 1/3 c. certified gluten-free oats
1 c. pomegranate Craisins
1/2 c. nutella
4 tbsp. unsweetened cocoa powder
1/2 tsp. vanilla

Please note that not everyone with celiac can ingest gluten-free oats as I explain in this link.

Place your oats in a bowl and drizzle a little milk over them and let them sit for about 5 minutes. You don't want to get them wet, you just want them damp enough to soften them. Original no-bake cookies call for quick oatmeal, so that's why you're doing this.

Combine sugar, butter, salt and 1/2 c. milk into saucepan and heat over low-medium heat until sugar dissolved, then cook for about a minute longer, then add vanilla.


Add your oats, and heat for another minute or two.

Add cocoa and nutella ...


then the Craisins. Turn off heat.


Mix thoroughly, then let sit in pan for two or three minutes.

Drop by spoonfuls onto baking sheets lined with wax paper.


After they have completely cooled, store them at room temperature in an airtight container for a few days. If you store them longer, put them in the refrigerator.


Enjoy, and Happy World Nutella Day!

LinkWithin

Related Posts Plugin for WordPress, Blogger...